UV Unwrapping and 4K Rebaking for a Headless Clothing Model
A prompt for re-unwrapping a selected headless 3D model containing clothing, hands, and feet into UVs that are easy to read and repaint, then rebaking the existing textures at 4K. It preserves the original data while covering seam design, distortion checks, packing, and side-by-side verification.
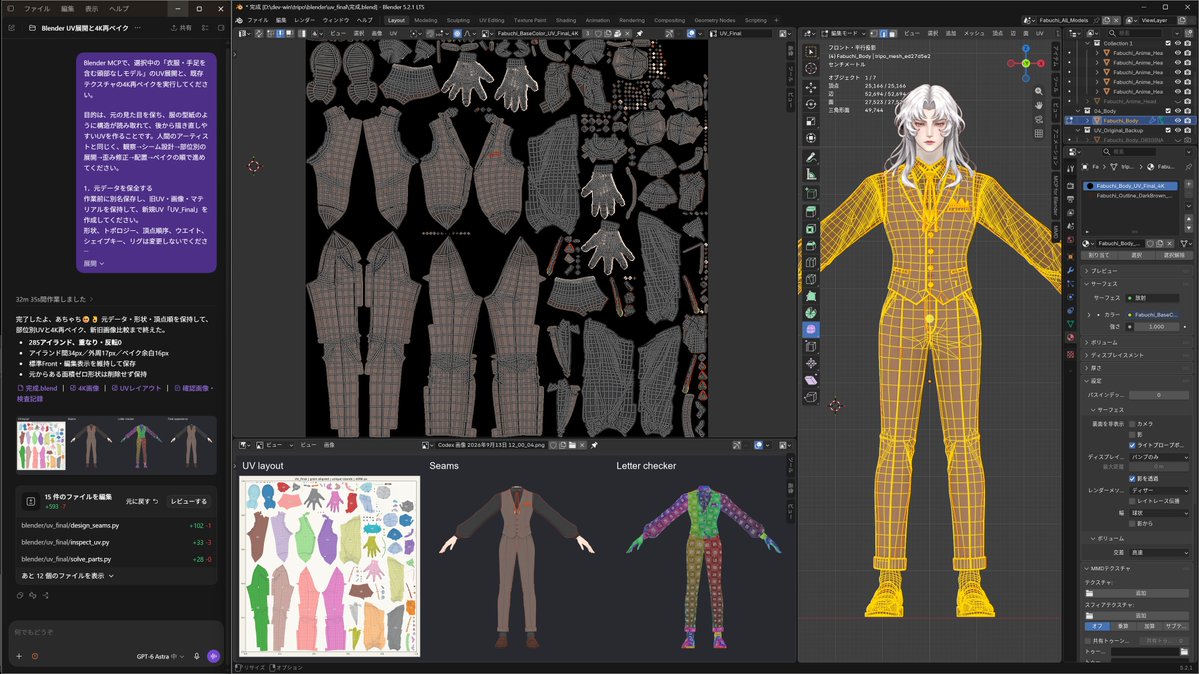
Using Blender MCP, unwrap the selected “headless model containing clothing, hands, and feet” and rebake its existing textures at 4K.
The goal is to preserve the original appearance and create UVs whose structure is easy to read and repaint later, like clothing patterns. Work like a human artist, following this order: observe → design seams → unwrap by region → correct distortion → arrange → bake.
1. Preserve the original data
Save a copy under a new name before starting. Keep the old UVs, images, and materials, and create a new UV map named “UV\_Final.”
Do not change the shape, topology, vertex order, weights, shape keys, or rig.
2. Inspect the model and design seams
Inspect the model from every direction with the original texture displayed and the wireframe visible. Identify the clothing parts and the actual seam locations.
For clothing, follow the pattern structure of the bodice, sleeves, collar, and other parts, opening the mesh along areas such as side seams and the inside of sleeves. Place seams on the skin, hands, and feet in less noticeable areas such as the inner or side surfaces, and arrange them so the spaces between the fingers can be opened without undue strain.
Do not mistake wrinkles or printed designs for seams, and do not create unnecessary fragmented islands.
3. Unwrap by region and correct distortion
Unwrap each region separately instead of processing the entire model as one piece.
Using a checker texture with text that references UV\_Final and the Stretch display, check for stretching, compression, twisting, flipping, and overlaps.
Add or clear seams according to the cause of each problem, adjust with tools such as Pin and Relax, and check again. Do not simply repeat the same automatic unwrap; preserve regions that have already been improved.
Do not treat a full-model automatic subdivision with Smart UV Project as the finished result.
4. Align grain, texel density, and placement
For clothing, use the fabric grain of each piece as a guide and align its primary vertical direction with the V direction of the UVs. Do not forcibly reshape curved patterns into rectangles.
Match the texel density relative to real-world size, and orient the pieces so corresponding left and right sides are easy to identify.
Then pack them into the 0–1 space while maintaining their orientation and relative scale. Do not overlap left and right pieces or rotate them arbitrarily.
For 4K, use an initial margin of 16 px around the bake, at least 32 px between islands, and at least 16 px from the image borders.
5. Bake from the old UVs to the new UVs at 4K
Explicitly set the original texture references to use the old UVs, set UV\_Final as the bake target, and transfer them to a new 4096×4096 image.
Activate the bake-target image node in each material, perform a test bake, and then run the final bake.
For the base color, use only Diffuse Color or Emit. Do not bake in new lighting, shadows, or AO. Preserve the shading drawn in the original images.
Transfer existing maps such as alpha as needed. Rebake tangent-space normals based on the new UVs rather than treating them as simple color transfers.
6. Verify the result by comparing old and new versions
Apply the new UVs and baked images, then compare the full model and details under the same display conditions as the original.
Check the placement, color, transparency, and seam continuity of patterns. Correct collapsed or overlapping UVs, missing unwraps, and bake artifacts such as black spots, gaps, and bleeding.
Judge completion by the inspection results, not by how many times the model was unwrapped.
Save completed.blend, the 4K images, the UV layout, and reference images showing the seams, checker texture, and final appearance. Briefly report the main corrections made.
Do not stop at explaining the plan; complete the work while inspecting the actual images.
How to use this prompt
01
Start with the right workspace
Open your preferred coding assistant or 3D tool. Use the model shown on the example as a starting point, and check any linked project for setup instructions.
02
Choose one thing to change
Swap the subject, art style or setting. Keep the camera and interaction clear. Build a small version first, then refine one detail at a time.
03
Give the scene its own assets
For a custom character or prop, create a 3D model from a short object description or reference image, then bring it into your project.
Previews belong to their respective creators. Check the original source and project license before reusing code or assets.